Showing posts with label Brunch. Show all posts

Friday, November 4, 2011

MARGHERITA FRITTATA. Thanks Queenie.


I always wondered where the name Margherita Pizza came from.

Simple fresh ingredients.

Delicious combination.

But how did they come up with Margherita?

Rumor has it, that back in 1889, Queen Margherita of Italy, went to Naples and was served a pizza that resembled the colors of the Italian Flag.

Red = Tomato, White = Mozzarella and Green = Basil.


Someone really wanted to impress Queen M. by coming up with that delicious red, green & white combination. 

I would imagine she took one look at that fresh Mozzarella all melted in with the fresh ripe tomatoes and basil and said "Bellessima!'


Just think........ if the person who came up with the Margherita pizza for Queenie was alive today, he'd have his own Food Network show.

If Queen M. ever came to visit Kansas, I believe this is what I'd present her.

Your Majesty, I present you a Margherita Frittata.

I think she'd like it.

3 eggs
Splash of Milk
2 Tbsp. Extra Virgin Olive Oil
4 or 5 fresh Cherry Tomatoes, sliced
Fresh Mozzarella
Fresh Basil (I used 1 green onion stem, sliced in place of basil. Queenie is gonna have to live with it)
Kosher Salt 
Fresh grated Parmesan Cheese

In a bowl, whisk the 3 eggs with a splash of milk.

Dice up your cherry tomatoes into nice little slices.

If you are using basil leaves get them ready buy pulling the leaves off the stems.  If you are using green onions as I am doing, slice only the green stem of one green onion.

Now take your fresh Mozzarella ball and slice about 4 nice round thin-ish slices.

Bel Gioiso brand of fresh mozzarella is normally what I find in my grocery store.  It comes in a round ball, about the size of a baseball.


HINT:  Keep refrigerated until ready to slice.  It's much easier to slice when the Mozzarella is completely chilled and not room temperature.

Set your skillet to Medium heat.  I normally put my setting to #7.

Pour 2 Tbsp. of olive oil into your skillet.  Tip the skillet so the oil covers the entire bottom of the pan.

I use a 9 or 10 inch non-stick skillet.  I find non-stick works best for an easy-slide-out Frittata.  I've had several "stuck" Frittatas, and it's not pretty.  In the end, you might as well say they were "scrambled eggs".
Heat your olive oil in your pan for just about one minute.  You don't want it to be scorching when you pour your egg mixture in.

Pour in your egg/milk mixture.  

Now sprinkle your sliced tomatoes all around on top of the egg mixture. 

Just like you would a pizza.

Gently lay your four round slices of Mozzarella evenly around into the mixture.

Same with your basil pieces or in my case, the green onions (Sorry Queenie). 


Let your Frittata sort of do it's thing for a while.

Practice your Italian for when the Queen arrives, or get your curtsy down-pat.

What you will be watching for is the egg will start to pull away just slightly from the pan and it will start to some-what solidify.

The center will still have some egg liquid, but you will start to see the cheese melting, and the liquid should be reduced to less than half of what it was originally.


Quick, now is the time you need to sprinkle the top with a pinch of Kosher salt, turn the heat down to the lowest setting, and cover the pan.

More time for you to practice your Italian.....

Welcome to Kansas Queen M.   "Benvenuti nel Kansas Queenie".

After about 4 minutes or so, you should see the egg has totally set and is ready to perfectly slide out of the pan onto the Royal Platter.  

Ask your Majesty if she would like a sprinkling of Fresh Parmesan at this point.
BELLISIMA!


Sunday, October 2, 2011

EUREKA! Bippity Boppity BACON PIE.

 
Bacon.

My favorite comedian, Jim Gaffigan, could not have said it any better when he describes bacon as; "The most beautiful thing on earth".

Even the frying of bacon sounds like applause.

He has an entire skit solely about Bacon.

He says that bits of bacon are.... "Like the Fairy Dust of the food community."

Sprinkle bacon on anything and suddenly, you can't wait to dig your fork into it.

Oh, don't want your salad?............. sprinkle sprinkle.....BLING................Now it's the favorite part of your meal.

So without further ado, I wave my magic wand, and bring you:

BIPPITY BOPPITY BACON PIE

12 slices of bacon, crisply cooked and crumbled
1 c. shredded Swiss or Monterrey Jack cheese (4 ounces)
1/3 c. shredded Parmesan Cheese
1/4 c. diced onion
3/4 c. Original Bisquick mix
1 1/2 c. milk
3 eggs
Salt & Pepper for seasoning

Preheat oven to 400 degrees.

Fry and crumble your 12 slices of bacon. 

I normally don't fry my bacon because it creates such a mess, so I use a slotted baking rack, and bake the bacon strips at 350 for about 20 minutes, flipping once.  They come out perfectly with no splattery mess on your stove.

Note regarding the onions:  If you like your onions to have a "crunch", then no need to do the next step by sauteing them.  Personally, I have to saute them to take the crunch away, or hubby won't even come near the kitchen.  He won't even take a bite into something that has crunchy onions.  Even if it IS loaded with bacon.

If you are wanting to saute your onions to take the "crunch" away, and if you are using the skillet method to fry your bacon then empty all but 2 Tablespoons of the bacon grease from your pan, and saute onions until soft.  If you are using the oven method to cook your bacon, then save 2 Tbsp. of the bacon grease and transfer into a frying pan, and saute onions.

IMPORTANT: BE SURE TO strain all the grease from your sauteed onions before adding. Otherwise, this pie will be called "Bippity Boppity Grease Pie".

Spray a 9 inch glass pie plate with non-stick spray and sprinkle the Fairy Dust of the food community (the bacon) in the bottom of the pie plate.

Hubby is out of town so I'm not going to bother sauteing my onions.  I like a little crunch to them, so I'm just dicing them up and and sprinkling them right on top of the bacon pieces.


Mmmm bacon.


Now sprinkle your Monterrey Jack cheese (or Swiss) and Parmesan Cheese on top of bacon.


 In medium bowl, beat together the Bisquick, milk, eggs, salt and pepper.

Gently pour into pie plate on top of the cheese and bacon.


 Pop your Bippity Boppity Bacon Pie into the oven and bake for approximately 35 minutes or until top is golden brown and center is not jiggly.


Try to refrain yourself from slicing and eating like a bacon-crazed mad person, and please let the pie sit for about 10 to 15 minutes before cutting.


EUREKA!

It's Bippity Boppity.......BACON!


Serving Suggestions and Additional Ideas:

 * Feel free to add other items into the pie such as small diced tomatoes, diced mushrooms, diced red pepper, or whatever you like to eat with your BACON.

* Serve as a breakfast or brunch item with fresh fruit.  OR serve as a main course with side salad or a side of green beans or steamed broccoli.

Everything tastes better with bacon.

Thursday, September 8, 2011

Change-it-Up Rule................POTATO EGG CASSEROLE


I love a recipe that lets you change-it-up to your liking.

I've butchered many a recipe, where I've tried to Change-It-Up, or varied it to my taste buds.

This Potato Egg Casserole is very forgiving.

Don't like Mushrooms.....No Problem......add Spinach.

Don't like Red Pepper.....No Problem.......add Green Pepper or even diced tomatoes.

Don't like Sausage......Not a Problem people.....add Ham or Bacon.

You get the picture.

So go ahead, if you don't like the ingredients I've used in this recipe, use the Change-It-Up Rule.

It will turn out perfectly, no matter what you swap or switch out.


6 eggs
1/2 c. milk
20 ounce bag refrigerated diced potatoes with onions (equal to 3 cups)
6 links of Jimmy Dean Brown-N-Serve Sausage Links
1 c. Baby Portabella Mushrooms, diced fine
1/4 c. Red Pepper, diced fine
1 c. shredded Longhorn Cheddar Cheese
Kosher Salt
Black Pepper
Olive oil

Preheat oven to 350 degrees.

Lets start with the basics:

1.  I find that 6 eggs and 1/2 cup milk works best for a 9 x 9 casserole pan.  That's pretty much a given, so don't change-it-up too much when it comes to the egg/milk basics.

2.  Refrigerated pre-diced Potatoes are perfect for this recipe.  No dicing and slicing necessary; which makes them ideal for a house filled with hungry mouths and a fast ticking clock.

3. Ditto with the Brown-N-Serve Sausage Links. No frying necessary. This just makes my life so much easier.

These are the refrigerated diced potatoes I'm using.  They already have diced onions in them which gives me more free ticks on my fast ticking clock.

But if you can't find the ones with onions....remember our little Change-It-Up Rule;  If you like em' add em' , if you don't, forget it.


The refrigerated potatoes are perfectly cut in cute little squares.  So handy.


Place your potatoes in a large bowl and set aside.

Dice up your mushrooms, or your Change-It-Up veggie, into one cup.

Make sure they are smallish in size. 

Set aside.


Now dice up the red pepper, also smallish, to 1/3 cup measurements.  Set aside.


If you're using a veggie that might be a bit stronger in flavor, like the red pepper, or onion or green pepper, I like to use only 1/3 cup so the flavor doesn't take over the dish.

That way the milder veggies, like mushrooms, tomatoes, or fresh spinach, or whatever change-it-up veggie you use, can be in 1 cup measurements.

Now for the meat portion. I use the Jimmy Dean Brown-N-Serve sausage links.  That way, no frying or prep time is taking up my ticking clock.

They come in a convenient 2-pack.  Not to be confused with Tupac.  6 sausage links to each pack.

Use only ONE pack, and toss the other pack in the fridge for another time.


Dice up the 6 sausage in bite-sized pieces and set aside.


 In a medium bowl, beat the eggs and milk, and pour over the potatoes.


Add two nice sized pinches of Kosher Salt to the potato egg mixture and combine well.


In a frying pan, squirt in about 2 Tablespoons Olive Oil and on medium high heat saute the red pepper, mushrooms and sausage pieces.  Just until everything gets nice and warm, and tender.

Once done, combine with potato egg mixture.


Shred your Longhorn Cheddar cheese, or whatever Change-It-Up cheese you prefer, and toss with potato mixture and combine all ingredients.

Spray a 9x9 square casserole pan with non-stick spray and pour in your mixture.

Sprinkle top with a little black pepper. 


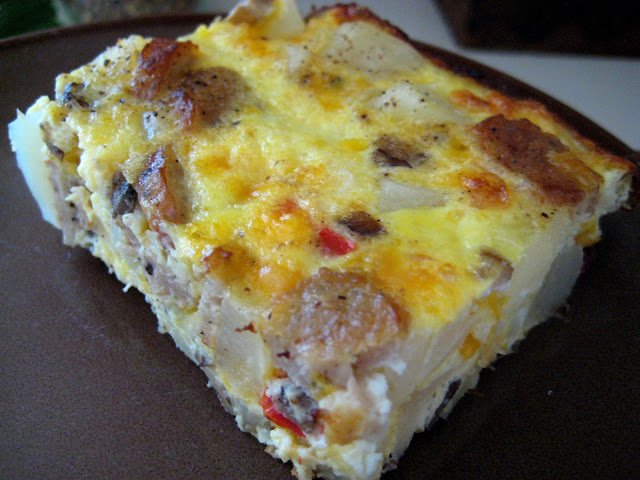
Toss in your pre-heated oven for about 40 minutes.  Keep an eye on it, as you're looking for the egg to not be jiggly in the middle.  Oh, I hate the word jiggly.  Which reminds me....I need to go to the gym when I'm done posting this.
Should look something terribly delicious, like this.


Quick little Egg Casserole Tip:

Always let your egg casserole (also goes for any sort of Quiche) sit at room temperature for a good 15 minutes before cutting.  20 minutes would be even better.  It cuts much easier, and for some reason, the flavors come together after it has set for awhile.

Once your casserole has finished his little 20 minute nap, cut into nice little squares.


Use the Change-It-Up Rule, and make this for dinner.

Thanks to Little Kitchen On the Prairie for the fantastic idea.

Adapted from Little Kitchen on the Prairie

Tuesday, August 30, 2011

Savory Girly Girl SPINACH & SWISS Brunch Muffins.


Sometimes us Girly Girls get tired of making Manly Man food.

When hubby goes out of town, many times my dinner consists of, sliced fresh fruit, extra sharp cheese slices, almonds, Wheat Thins and a glass of wine.

Don't get me wrong, I do love my meat & potatoes.

But sometimes a Girly Girl just wants dainty brunch food.

So if a Brunch is in your near future, or maybe an afternoon tea, or a bridal/baby shower.....or even a dinner alone, then give these Girly Girl Spinach & Swiss muffins a try.

I think you'll really love them.

This recipe makes 12 Girly Girl Muffins.

2/3 c. milk
1 Tbsp. vegetable oil
1 egg
2 c. Original Bisquick Mix
3/4 c. coarsely chopped fresh spinach
3/4 c. shredded Swiss cheese
1/4 c. freshly grated Parmesan cheese
2 Tbsp. chopped green onion (or if you prefer, you can add 3 slices cooked & crumbled bacon)
Tiny pinch of Kosher Salt
Soft butter or softened cream cheese for Schmearing (Herb flavored cream cheese is so very Girly too)

Click Here for Printable Recipe

Heat your oven to 400 degrees.

Grease your 12 cup muffin tin.

Grab a nice big handful of fresh spinach, and chop it all up.


We're Girly Girls remember, we don't want big chunks of Spinach to get in our teeth now do we?

Do the same with the green onion (and the bacon if you are adding).  Dice it all up nice and dainty.

Now would be a good time to shred your Swiss cheese too and get out your freshly grated Parmesan cheese.

I buy the already grated Parmesan cheese in the little plastic tubs but if you have a chunk of Parmesan cheese, by all means...grate away.  Kudos if you do!


Combine the milk, oil and egg until blended.

Add Bisquick, spinach, onion and cheeses and the dash of Kosher salt.  Combine.

Batter will be thick and sticky.

Spoon batter evenly into your greased 12 cup Muffin Tin.


Bake for about 15 minutes or until golden brown.

Keep an eye on them, that's what the oven window is for.

Cool for about 5 minutes.  These little Girly Girls will pop out perfectly.


So cute and Brunchy.


Please serve these little girls warm.  That's when they show-off their best.

You can make these ahead of time, just be sure to heat them before serving.

If you are having a Girly Girl dinner alone, then pop one in the microwave for about 8 seconds.

Or if you are having them at a later time, you can pop several in a Gallon Sized Ziploc bag and Microwave just a few seconds until warm.

My Girly Girl Serving Suggestions:

*Delicious served with sliced fresh fruit (strawberries, grapes, pineapple) soft butter for a little schmear (or softened cream cheese is great too - especially the herb flavored kind), and of course a glass of white wine - This is my favorite way to serve.

* Nice accompaniment with a Girly Girl Salad, and of course a glass of white wine.

* And of course, if you MUST serve to a Manly Man, these are great served with softened butter and a big ole chunk of juicy steak meat, right off the grill. Oh, and a glass of white wine - gotta keep it Girly.


Wednesday, August 24, 2011

BIG HANDS Hearty Bacon, Lettuce & Tomato Sandwich


Summer in the Midwest means loads of tomatoes, which means BLTs galore.

Personally, when I make an old fashioned BLT on white toast, I could easily eat two, and I'm not a Big Hands person. Not to mention a couple slices of bacon that secretly disappear before the sandwiches are even assembled, I can still easily eat two regular BLTs.

So, next time you have some hungry Big Hands you have to feed, here's a Hearty version of a good old-fashioned Bacon, Lettuce & Tomato Sandwich for the Big Hands people in your life.

1 roll refrigerated Home-style Grand Biscuits (will make 4 Big Hands BLTs)
1 pound thick cut bacon (Peppered Thick Cut is my choice, but if you are not a Pepper person, then regular Thick Cut is perfect too)
Ripe Tomatoes, sliced
Lettuce
Mayo

Here's where we bump up a regular BLT on toasted white bread, to the Hearty version that turns a regular sandwich into a meal for Big Hands.

I used a roll of refrigerated Grand Biscuits (Whole Wheat Reduced Fat) but please by all means, feel free to use the regular Home-style Grands.

This is the kind that I used.


But in all honesty, I think the Big Hands person in my life, would have preferred that I used the regular kind as opposed to the Whole Wheat Low Fat.  He didn't actually say this, bless his heart, I just had that wifey feeling.

But since I was trying to be some-what healthy (if that's at all possible when using Thick Cut Bacon) I decided to go with the Whole Wheat.  Trust me, his Big Hands ate it anyway, Whole Wheat version and all.

So feel free to use the regular Buttermilk home-style instead in case your Big Hands person is picky.
Get the regular BLT players all set up and ready.

You know, the Mayo, the Lettuce, and of course the star of the show, your Thick Cut Bacon.


I sometimes use the Pepper Thick Cut bacon for a bit more flavorful sandwich, but regular Thick Cut is good too.

I also put mine in the oven at 350 to avoid the stove-top splatter.

After you have all the players ready to go, turn the oven to 350 and get ready to make the Big Hands biscuit bread.

Open the roll and separate out the 8 biscuits.

Take a biscuit and roll it out flat, until it becomes 4 to 5 inches in diameter.


Do this to all 8 biscuits.

Pop your flattened biscuits onto a cookie sheet and bake at 350 until golden brown.  About 18 minutes or so.

When they come out of the oven, they're perfect in every way.

Each biscuit will have a some-what puffed up side (which will be the pretty top side of the sandwich) and underneath they will have a flat side, perfect for stacking purposes.


Oh my goodness, the possibilities are endless with these babies. 

Imagine making Breakfast Sandwiches with these........a fried egg, a little slice of ham and of course a slice cheese. 

My mind is going crazy trying to think of other uses for these Big Hands bread slices.

Ok, now it's time to start stacking on the flat side.

Schmear some Mayo (if that's your schmear of choice)

A couple of thick slices of tomatoes

 
And of course, as many bacon slices as your heart desires

A couple slices of crisp cool lettuce.

And VOILA!

Here you have it.

A BIG HANDS BLT.


Now that's a one hearty Bacon, Lettuce & Tomato Sandwich.

Your Big Hands will thank you.