Sunday, June 19, 2011

Leave it to the Professionals PULLED PORK


Pulled Pork is probably on the Top 3 of my all-time favorite food.

Scratch that, let's say Top 2.

But from what I hear, there is quite an art in smoking a Pork Butt and it can be very complicated.

Things can get pretty darn argumentative when you get a roomful of BBQ enthusiasts talking about the best way to smoke their butts.

These people are SERIOUS about their method of smoking meat.


Hours and hours and hours go into smoking this divine substance.

10 or more hours standing by the smoker, adjusting the temperature, keeping the fire just right - it's something to be perfected by trial and error, and years of experience.

Not to mention the Rub that goes on the Butt before-hand.

The different recipes and arguments regarding just the RUB itself is mind boggling.

Oh and the "Smoker" itself.  People can talk for hours and hours about what smoker machine is the best.

The wood chips are another argument.  Did you know there is apple, cherry, mesquite, peach; the list goes on and on.

So the argument goes something like this:
What smoker to use (I have no idea)
What type of rub to use (not a clue)
What type of wood chips (I'm dumbfounded)
Do you marinate before smoking (I guess)
Do you inject with a liquid (huh?)

I've never attempted to smoke a Pork Butt.  Nor would I even consider trying.

It's complicated, confusing, time-consuming and frankly, all the possible variations gives me a headache.

So I've made a very serious decision.  I've decided I'll leave smoking meat to the professionals.

This Crock-pot version takes just as long as it would to smoke it, but instead of standing by a smoker for hours on end, you can sleep, shop, watch TV, or sit back and watch your neighbor rubbing his eyes, cause the smoke from HIS smoker just blew in his face.

WARNING:
To all the BBQ smoking professionals out there; I do not, or will not admit that this version is as good as smoking a Pork Butt.  So please don't get all Pork Butty on me and start saying how smoking meat is the best way. I already know that.  It's just that this old gal doesn't know how to smoke her butt. 


Click Here for a Printable Recipe

4 to 5 Lbs Pork Shoulder (there's a big long story about why it's called Pork Butt - BUT it's really pork shoulder)
BBQ Rub
3 c. Apple Juice
BBQ Sauce
White Hamburger Buns

That's it.  5 ingredients.  I don't see what all the fuss is about guys.

Time-frame:
The marinating time should be 12 hours minimum and the cooking time in the crockpot is about 7 hours.

So if you want to serve this for dinner around 5ish, start marinating the night before, wake up, put pork in crockpot, turn it on and come back 7 hours later.

I mean honestly BBQ professionals, what's the big deal.

Ok let's get started.

We're gonna sprinkle some sort of BBQ rub all over the pork shoulder.

There are literally thousands to choose from.  Just find one that has salt and sugar as the first two ingredients.

I used Jim Baldridge's Secret Seasonigs just because that's what hubby's cousin uses and that's all I had in the cabinet.  But to Mr. Baldridge's defense, it's pretty incredible.


Don't be afraid, take the seasoning and sprinkle all over the pork.  Rub it in really good with your hands. Don't be sparse, you're gonna want to cover the entire pork butt with the seasoning.


Place the pork in a large Ziploc bag, or if the pork is too large, then wrap it really well in saran wrap.

Once wrapped, massage the pork so the spices get all pushed in the meat.  Your thumb nail should look like mine below, coated with the Rub.  This is the dirtiest part, at least we aren't having to stand outside with all that smoke in our eyes.


Plop your pork in the fridge to marinate for a minimum of 12 hours.

Fast forward AT LEAST 12 hours.

Hopefully you have a 5 quart oval Crockpot.  That is really the best size and shape.


Pour your apple juice in the bottom of the Crockpot, place pork inside, cover, set on low and let the Butt do it's thing.

After about 7 hours, take off the lid.  Jab your fork into the pork and it should literally fall apart.  If not, then it needs to cook for longer.

When finished cooking, carefully pull pork out of the juice and lay on a cutting board.

Try to be sure you don't pull alot of the liquid out with the pork.  We don't want the pork to be all juicy and wet.  Discard liquid after the pork has been taken from the Crockpot.

Let cool for a few minutes and pull off any fatty pieces.  Once that's finished,  get to "pulling" that pork.


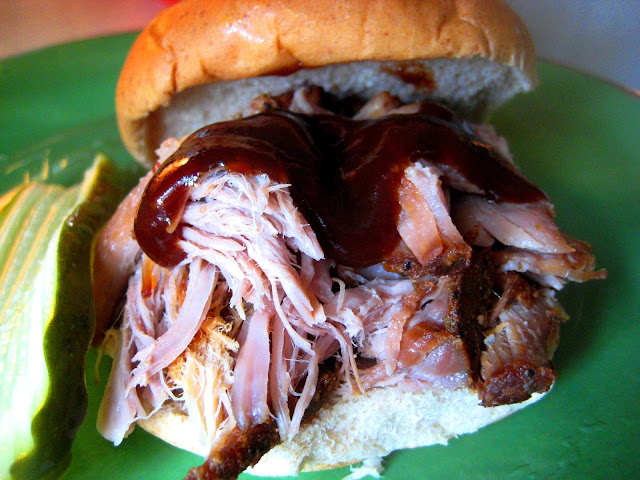
Pile a mound of this wonderment ontop of a white hamburger bun, and top with your favorite BBQ sauce.


Boy oh boy oh boy oh boy.


If you are in the mood for some delicious pulled pork but don't want to make all those "how to smoke meat" decisions, you might wanna cook your Butt like this.

And leave the Smoking to the Professionals.


Tuesday, June 14, 2011

Easy Peasy RASPBERRY Cobbler. Eating Instructions Provided


I have a bad habit.  I will admit it.  Sometimes I get anxious when people don't "eat the way I eat".

According to my daughter,  I always seem to make gentle "suggestions" to people on HOW to eat something. (I do it out of love of course).

For instance, I gently "suggest" (over and over again - or so I'm told) ..."Be sure and squeeze a little lime juice on the fish before eating it"............. or........ "Oh please don't forget to dip this into that".........or....."I think you should pour this on top, it tastes really good that way"

My daughter frequently announces to me: "Stop telling me how to eat!"

Hubby is a little more polite to me, and simply says "No Thank You, I like this on top it instead".

You'd think I'd learn to just let people eat.  After all, people DO know how to eat right?

All I'm trying to do, is make sure that a person has the best eating experience possible.

Isn't that what a good mom slash hostess slash cook is suppose to do?

So without further ado. I'm gonna tell you exactly how to eat this Raspberry Cobbler.

CLICK ME for Printable Version

1 stick butter
1 1/4 c. sugar
1 c. self-rising flour
1 c. milk
1cup fresh raspberries ( 6 ounces or 1/2 pint)
1 Tbsp. Raw Sugar
Vanilla Ice Cream - if you forget the Vanilla Ice Cream, then you better get right back in your car and head to the store.

Pour your self-rising flour and 1 1/4 cup of sugar in a mixing bowl.  Take your stick of butter and place it in a microwaveable bowl and melt.

While the butter is melting, pour your 1 c. milk into the flour mixture and using a whisk, whisk away.  Now pour the melted butter in your flour mixture and again, whisk whisk whisk.


Now go and get your round casserole dish.  I have a little round shallow dish I use for cobbler or for casseroles.  But of course, if you have a square one, cobblers can be square too.


Spray your casserole dish with non-stick spray and pour your batter into your pan.

Take the Raspberries and drop them right on top of the batter.


Now take your raw sugar and sprinkle all over the top of the batter and Raspberries.  I love raw sugar because it looks like little diamonds sprinkled on top of your baked goods.  It adds a bit of a sweet crunchy topping.  I put it on top of my Cranberry Bread or Banana Bread and on top of the crust on some of my pies. 

Sprinkle away all over the top.  See how pretty raw sugar is?


Now bake your cobbler in the oven for 350 for about 50 minutes or until golden on top.  I like when the edges are a little brown and crunchy.


Normal recipes would just stop here.

But since I've been told that I continue to tell people how to eat, why on earth should I stop now?

Eating Instructions:


Serve cobbler warm, either out of the oven, or dish out individual servings and pop in the microwave for about 12 seconds.

Raspberries are known for their tart tangy flavor, and to me, the only way to eat cobbler, ESPECIALLY raspberry cobbler, is with Vanilla Ice Cream.

So if you forgot the Ice Cream, kindly ask hubby to quick like a bunny, go to the store and pick up some of your favorite type of vanilla ice cream.

I love these little individual Blue Bell Ice Cream cups.  They come in packs of 10, and you can just dish out your cobbler, and throw everyone an individual container of ice cream.  No need for the messy scooping out the ice cream, when you have these handy dandy little things.


So if you already know how to eat, I apologize in advance.

But please be sure to eat this Easy Peasy Raspberry Cobbler with Vanilla Ice Cream as directed below:

Take one bite of warm cobbler...then real quick-like, take a bite of ice cream. Gotta get both flavors going in your mouth ya know.

One bite of cobbler.....then  real quick-like, a bite of ice cream.
One bite of cobbler......then real quick-like, a bite of ice cream.

Continue until bowl is empty.

Your will belly will be so happy that you followed my eating instructions.


Saturday, June 11, 2011

Jimmy Dean Sausage Hash. Because the Queen Says So.


Hash of some sort has been around for years and years.   Every country has some form of recipe that they call Hash.  The common thread of all the many varieties, consists of some type of meat, carrots and potatoes.

The most well-known variety is Corned Beef Hash which dates back to the 1800s.

But alas, Scotland has their version of Hash, called Stovies.

Denmark's version of Hash is called Biksemad - translated to "tossed together food"  - that's funny.

In Austria there's Grostl which consists of " left-over meat topped with an egg".

In Mexico, there's Picadilio.

Oh I'm sure the list goes on and on from country to country.

I came up with my own version, as many countries have done over the years.

I like to call it.......Jimmy Dean Sausage Hash.

I know....I know.....it's not a very clever name. 

But hey, it's "MY" Country.   Population 5 by the way, and I'm the Queen of it.

And this Queen simply loves Jimmy Dean Sausage. 

So until my townspeople complain, and I'm over-thrown, it will be called Jimmy Dean Sausage Hash.  So there.


1 roll Jimmy Dean Sausage (because the Queen loves it)  - Regular Flavor
1 1/4 cup fresh carrots, cut into cubes
1/3 cup chopped onion (I use frozen) - not pictured.  I ALWAYS forget the onions in my pictures.
8 small Yukon Gold potatoes
1/3 cup beef broth, low sodium
6 eggs

* This will make 4 to 6 servings, depending on your appetite.

Yukon gold potatoes come in all sizes.  I used about 8 medium ones.  About this size:


Cut them in half, or in thirds, depending on the size.


Place them in a pot of boiling salted water.  We want them to boil until they are fork tender.

In the meantime, lets get these carrots cut into little cubes.

Be sure to use fresh carrots.  Trust me.  Canned ones will just get all mushy, and frozen ones...well, I've never used frozen ones so I can't really comment.

The Queen likes her carrots cut into little squares, just a tradition from my country that dates way back.

This is how I do it.

I cut the carrot lengthwise.


And then cut them again in half lengthwise until you have four slices.


Now get to cutting into little squares.  The Queen is hungry.


Take the carrots, sausage and the frozen onion, and throw it all into a big pot on medium high heat.

Use your wooden spoon to chop up the sausage into crumbles as it cooks.

Just when the sausage turns brown, and the pink is gone, pour in the beef broth and turn the heat down low and cover.  Let simmer about 10 minutes until the carrots get all tender.

***A Message From The Queen (Trumpets blare and the whole thing).......Don't get tempted to pour in more beef broth than the recipe calls for.  I did this once.  I got all carried away and poured  in extra broth, and it ended up being mushy hash.  I mean really mushy.  And the townspeople were very upset with me.

By now the potatoes should be fork tender.

Drain potatoes and place in with the sausage mixture.

Use your wooden spoon and gently mash up the potatoes to combine with the sausage mixture. Leave some of the potatoes in small chunks.


If your people like, you can eat the hash just like this, with toast or a Biscuit or English Muffin.

But my townspeople like to top our hash with an egg.


Add a little pepper............


Insert Fork here.....


Let Them Eat Hash! 


Wednesday, June 8, 2011

Summer is HERE! Roasted HEIRLOOM TOMATOES With Fresh Mozzarella


When most people start getting excited for Summer, they have visions of Refreshing Blue Swimming Pools, Family Vacations, and Cherry Flavored Popsicles. 

But not me.

I literally count the days until the warm weather arrives, and I can finally have Heirloom Tomatoes.

To me, Summer Time equals Tomatoes.  Plain and simple.


What is an Heirloom Tomato you might ask?

Basically it's a tomato that's been passed down through several generations because of it's valued characteristics.  A tomato variety that has been in circulation for 50 years.

Seeds that have been passed down from generation to generation.

Basically they are hand-me down seeds, from years and years and years of being perfected.

Then, it gets all Sciency and they cross these Heirloom Tomato Parent Plants...well you know, then they make all these wonderful OLD tomatoes that have been perfected over the years.

Heirloom tomatoes must be bought locally cause these little darlings are too delicate to ship, so the best place to buy them are at your local Farmers Market or Whole Foods, or maybe a local family owned grocery store.  Most of the big chain grocery stores don't carry them.  Cause you know, they buy their tomatoes from far far far away and have them shipped long long distances and they ripen in the semi truck on the way to the grocery store.  Yuck.

Enough of my rant.

Every Heirloom tomato is genetically unique.  They are so beautiful.  So many colors and fun patterns.  Oh and FLAVORS!


There are literally over a Hundred varieties of these perfect plants.  NOTHING is more perfect.


One Delicious way to serve these angels, and to really bring out their taste to the fullest, is to roast them.

This is my all-time favorite way to eat an Heirloom Tomato.

Roasted Heirloom Tomatoes with Fresh Mozzarella

1 large round Heirloom Tomato of any flavor/color
Freshly Grated Parmesan Cheese
Kosher Salt
Olive Oil
Fresh Mozzarella Medallions

Turn your oven onto Broil.  If you have an oven that says Hi Broil or Lo Broil, put it on Lo.
But if you don't, that's ok too. 

Ohhh and make sure your baking rack is set to the medium level.  We don't want it up really close to the broiler element.  That would NOT be good.


For this recipe, I selected a nice round Heirloom that will make two thick slices.

If you get a really large Heirloom, which there are many, you might be able to get three nice thick slices out of it.

Cut them into beef-steak type slices.


I take the left-over ends and pieces from the Heirloom and just dice them into nice chunks and put them in a baggie for later.

I add them to my scrambled eggs, or throw them on top of my salad.  Don't let this delicacy go to waste.

Place your slices on a greased cookie sheet.

Drizzle the top with Olive Oil.  Be generous.


Now, sprinkle top with Kosher Salt.


Now sprinkle the top with freshly grated Parmesan cheese.


On top of the Parmesan, place a slice of fresh Mozzarella.

I like to buy these Fresh Mozzarella in these little medallions.  This size is perfect for topping things with.


Now you can put one of these Medallion on top, or two.  Whatever floats your summer-time raft.

But I like to put two on top.  Just because it's that kind of day today.


Now pop your baking sheet into the oven.  Remember to have your rack set to the middle level.  We don't want to have these delicate things too close to the broiler element.

Keep an eye on them.  Make sure your oven light is on and keep checking them.  It should take about 6 minutes or so.  Depending on if you have a Hi or Lo broil on your oven.

You basically are wanting to be sure the cheese is all melty and has a couple brown bubbles on top.

When they're done, you will be able to tell.  Because your heart will start pounding really fast......and your mouth will be watering like the drinking fountain at your child's playground at the local park.

They will look something like this.


Oh holy summer-time!

Words can't express my happiness at this exact moment.


Serving suggestions:

* These are wonderful as a side item paired with a nice piece of fish and some roasted asparagus
* GREAT placed right on top of a juicy burger
* Incredible as a pizza topping....oh my
* Utterly wonderful as an appetizer with a glass of white wine


Well, all you summer fans.............go ahead, run along to the swimming pool.

I'm gonna stay right here and eat my Heirloom Tomatoes.

Tuesday, June 7, 2011

DUTCH OVEN LOVE: The battle between CRUESET vs LODGE


I'm an avid Food Blog follower, and a blog that I love to follow is "The Hungry Mouse".

She's incredibly fun and is one of my favorite food bloggers.

This week she featured the one of the most clever posts I've ever read. 

Being a HUGE fan of my Crueset Dutch Oven, she instantly had my attention.

If you have a Dutch Oven, or always see all the Food TV cooks with their fancy white-bottomed pans, and always wondered what they are and what kind to buy - then you really need to read her post. 

Quite the clever lady.  Trust me, you'll be glued to every word.

A Battle between two Dutch Ovens!
by Hungy Mouse

Let me start by saying: This was not a scientific experiment. This was one little mouse in her kitchen with 2 pots and 8 lbs. of short ribs.

When it comes to cast iron, to a lot of people, there’s Le Creuset and Staub, then there’s everybody else.

They’re the Rolls Royce and Bentley of cast iron cookery. Of course, they also both come with hefty (think $200+ in many cases) price tags.

So when a couple of folks asked me recently what kind of cast iron they should buy, I wasn’t sure what to say.

Dutch oven love


I love my Le Creuset dutch oven. It’s actually the only one I’ve ever had. I picked it up on a super sale at Marshall’s maybe 15 years ago for well under $100. (Get the same pot today on Amazon.com for $279. Yikes, right?)


Now do I have your attention?  That was just a little snip of her post.

Finish reading and find out which Dutch Oven won the Battle here:  Hungry Mouse's Dutch Oven Battle - Click Here